
The problem nobody warns you about
If you self‑host long enough, you eventually hit that moment.
You finally have a clean setup: a photo server like Immich, a couple of internal dashboards, maybe a media stack humming along nicely in your homelab. You point it at Cloudflare because, well… everyone does. DNS, TLS, tunnels, a free plan that feels generous.
And then you try to upload a few gigabytes of photos.
Suddenly you’re fighting upload limits, mysterious 413 errors, proxy timeouts, or you’re told to bypass the proxy entirely, defeating the whole reason you put Cloudflare in front in the first place. You realize Cloudflare was never designed to be your reverse proxy for self‑hosted apps. It was designed to protect and accelerate their network.
That’s usually the moment people start looking for alternatives.
That’s where Pangolin enters the story.
What Pangolin actually is (without the marketing fluff)
At its core, Pangolin is a self‑hosted reverse proxy and secure access platform.
But that description doesn’t really capture why it feels different.
Pangolin is built for people who:
- Run services at home or in a private network
- Want proper TLS, auth, and routing
- Don’t want arbitrary limits on uploads or request sizes
- Prefer owning the entire path from browser → proxy → service
Instead of pushing traffic through a massive third‑party CDN, Pangolin lets you run the control plane on a VPS and securely connect your private services to it using an agent (Gerbil).
Think of it as:
“Cloudflare Tunnels, but self‑hosted, predictable, and under your control.”
Why it’s genuinely useful for a homelab
Pangolin solves three annoying homelab problems at once:
1. Exposing services without opening your home network
Your services stay inside your LAN. No port forwarding. No router gymnastics. The agent establishes an outbound connection to your VPS, and Pangolin routes traffic securely back to your apps.
2. No artificial limits
This is where Pangolin shines compared to Cloudflare for self‑hosting:
- No upload size limits
- No request body caps
- No “this feature is for enterprise only” banners
If Immich needs to upload 20 GB of photos, Pangolin doesn’t care. It’s your proxy, your bandwidth.
3. One clean entry point for everything
Instead of juggling:
- Cloudflare Access
- NGINX configs
- Random VPNs
You get one dashboard where applications, domains, auth, and routing live together.
Pangolin vs Cloudflare (the self‑hoster’s perspective)
Cloudflare is excellent at what it’s designed for. Pangolin is excellent at what you need.
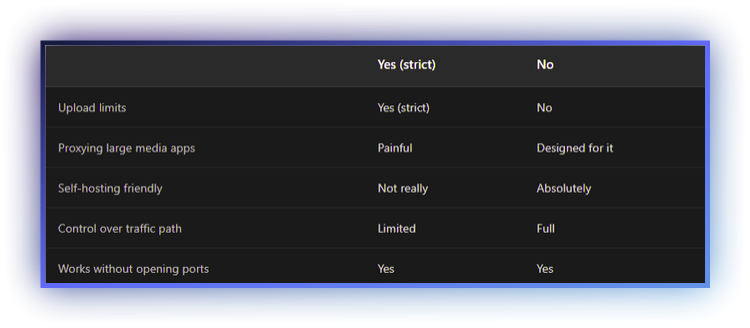
The Immich example is a perfect illustration: Cloudflare simply wasn’t built to proxy personal media servers. Pangolin was.
The architecture that actually makes sense
The best way to use Pangolin is:
- A cheap VPS as your public entry point
- Your homelab stays private
- Gerbil runs on the VPS and manages tunnels; your homelab connects using Newt to the VPS
Why this matters:
- Your home IP never needs to be exposed
- You can move ISPs without reconfiguring everything
- You can rate‑limit and firewall traffic at the VPS
A R100/month VPS is more than enough. In fact, Pangolin’s footprint is light enough that:
- Oracle Cloud Free Tier works
- ARM VPS instances work
- Bandwidth becomes your only real consideration
Installing Pangolin on a VPS (control plane)
This is where both Pangolin and Gerbil are installed together.
The installer deploys:
- Pangolin (dashboard, API, auth)
- Gerbil (WireGuard tunnel manager)
- Traefik (reverse proxy)
You don’t install Gerbil separately, it’s part of the VPS stack.
Prerequisites
You’ll need:
- A Linux VPS with a public IP
- A domain pointing to that IP
- Open ports: 80/TCP, 443/TCP, 51820/UDP, 21820/UDP
Ubuntu 20.04+ or Debian 11+ are the easiest choices.
A cheap VPS is more than enough, and free tiers (like Oracle Cloud) also work, as long as you open the required ports in the provider firewall.
DNS, domains, and firewalls (the part people overthink)
Use a wildcard domain - seriously
The easiest setup is a wildcard DNS record:
Type: A
Name: *
Value: YOUR_VPS_IP
This means every subdomain points to Pangolin:
- immich.example.com
- grafana.example.com
- anything.example.com
You never need to log back into your DNS provider to add records again.
This alone is a massive quality-of-life improvement over Cloudflare-style setups.
Firewall rules
On your VPS, you must allow:
- TCP 80
- TCP 443
- UDP 51820 (Newt → Gerbil)
- UDP 21820 (clients, optional)
How you do this depends on your provider:
- Most VPS providers have a firewall or security group UI
- Oracle Cloud users must edit Security Lists to allow these ports
Once provider-level rules are in place, ensure your OS firewall allows them too (UFW/firewalld).
Installation
SSH into your VPS and download the installer:
curl -fsSL https://static.pangolin.net/get-installer.sh | bashThen run it:
sudo ./installer
You’ll be prompted for:
- Base domain (example.com)
- Dashboard domain (pangolin.example.com by default)
- Email for Let’s Encrypt
- Whether to enable tunneling (you want yes)
Docker containers are pulled automatically, and within a couple of minutes the stack is live.
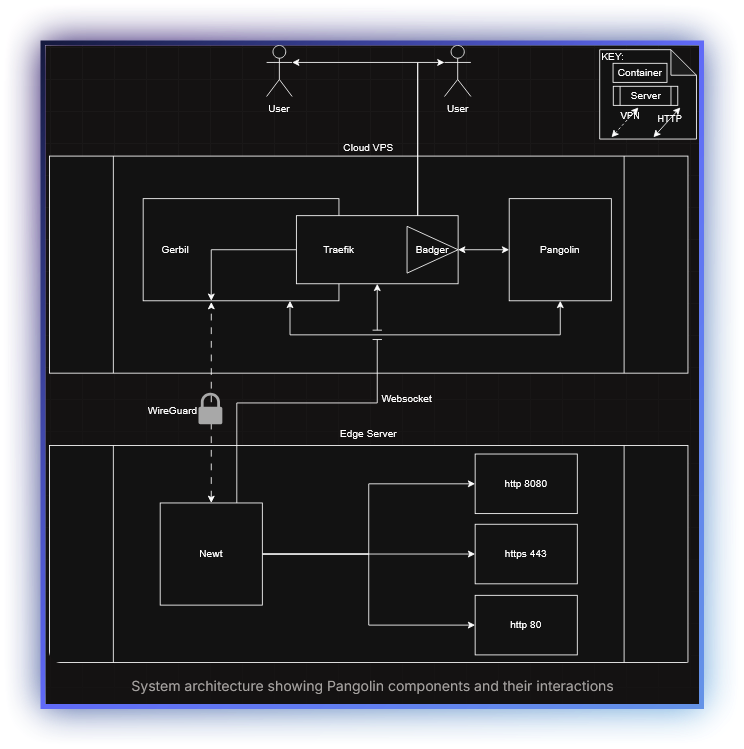
Understanding the real architecture (clearing up the Gerbil/Newt confusion)
This is an important clarification, and the docs are very clear once you see the full picture.
Gerbil does not run in your homelab.
- Pangolin runs on your VPS (control plane)
- Gerbil also runs on your VPS (WireGuard tunnel manager)
- Newt is the only component that runs in your homelab or edge network
Newt establishes:
- A WebSocket connection to Pangolin (control + orchestration)
- A WireGuard tunnel to Gerbil (data plane)
That’s why this architecture works so well behind NAT and CGNAT: everything from your home network is outbound only.
Once Newt is online, Pangolin can securely route traffic back through Gerbil and into your internal services.
This separation is intentional:
- Gerbil never needs to be trusted on the edge
- Your homelab never exposes ports
- All crypto and routing stay centralized on the VPS
Installing Newt in your homelab (the only thing you run locally)
After Pangolin is installed on the VPS, everything else happens from the dashboard.
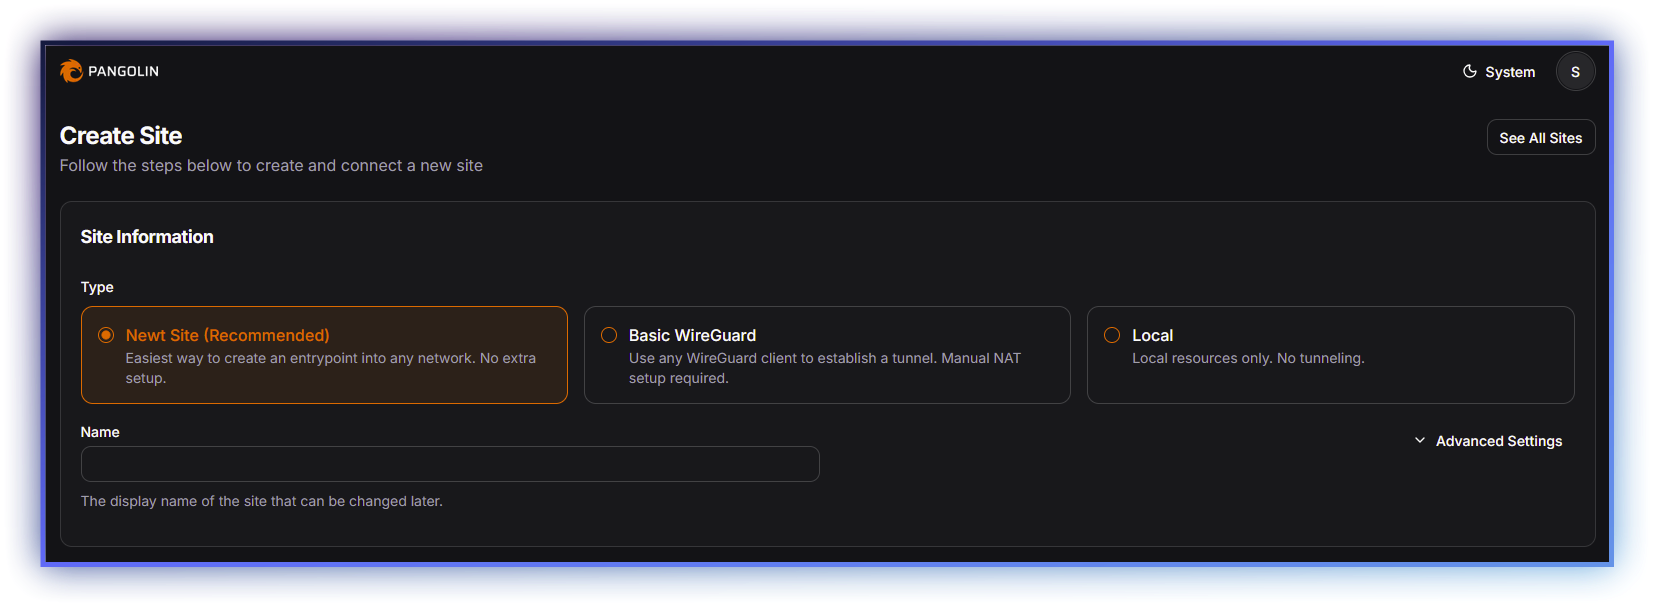
- Create a Newt Site in Pangolin
- Pangolin generates a ready-to-paste Docker run command
- Paste it into your homelab
That’s it.
Within seconds, the site shows as online.
No config files. No secrets to copy. No manual WireGuard setup.
This is the part that feels almost suspiciously easy.
Adding your first application (example: Immich)
From the dashboard:
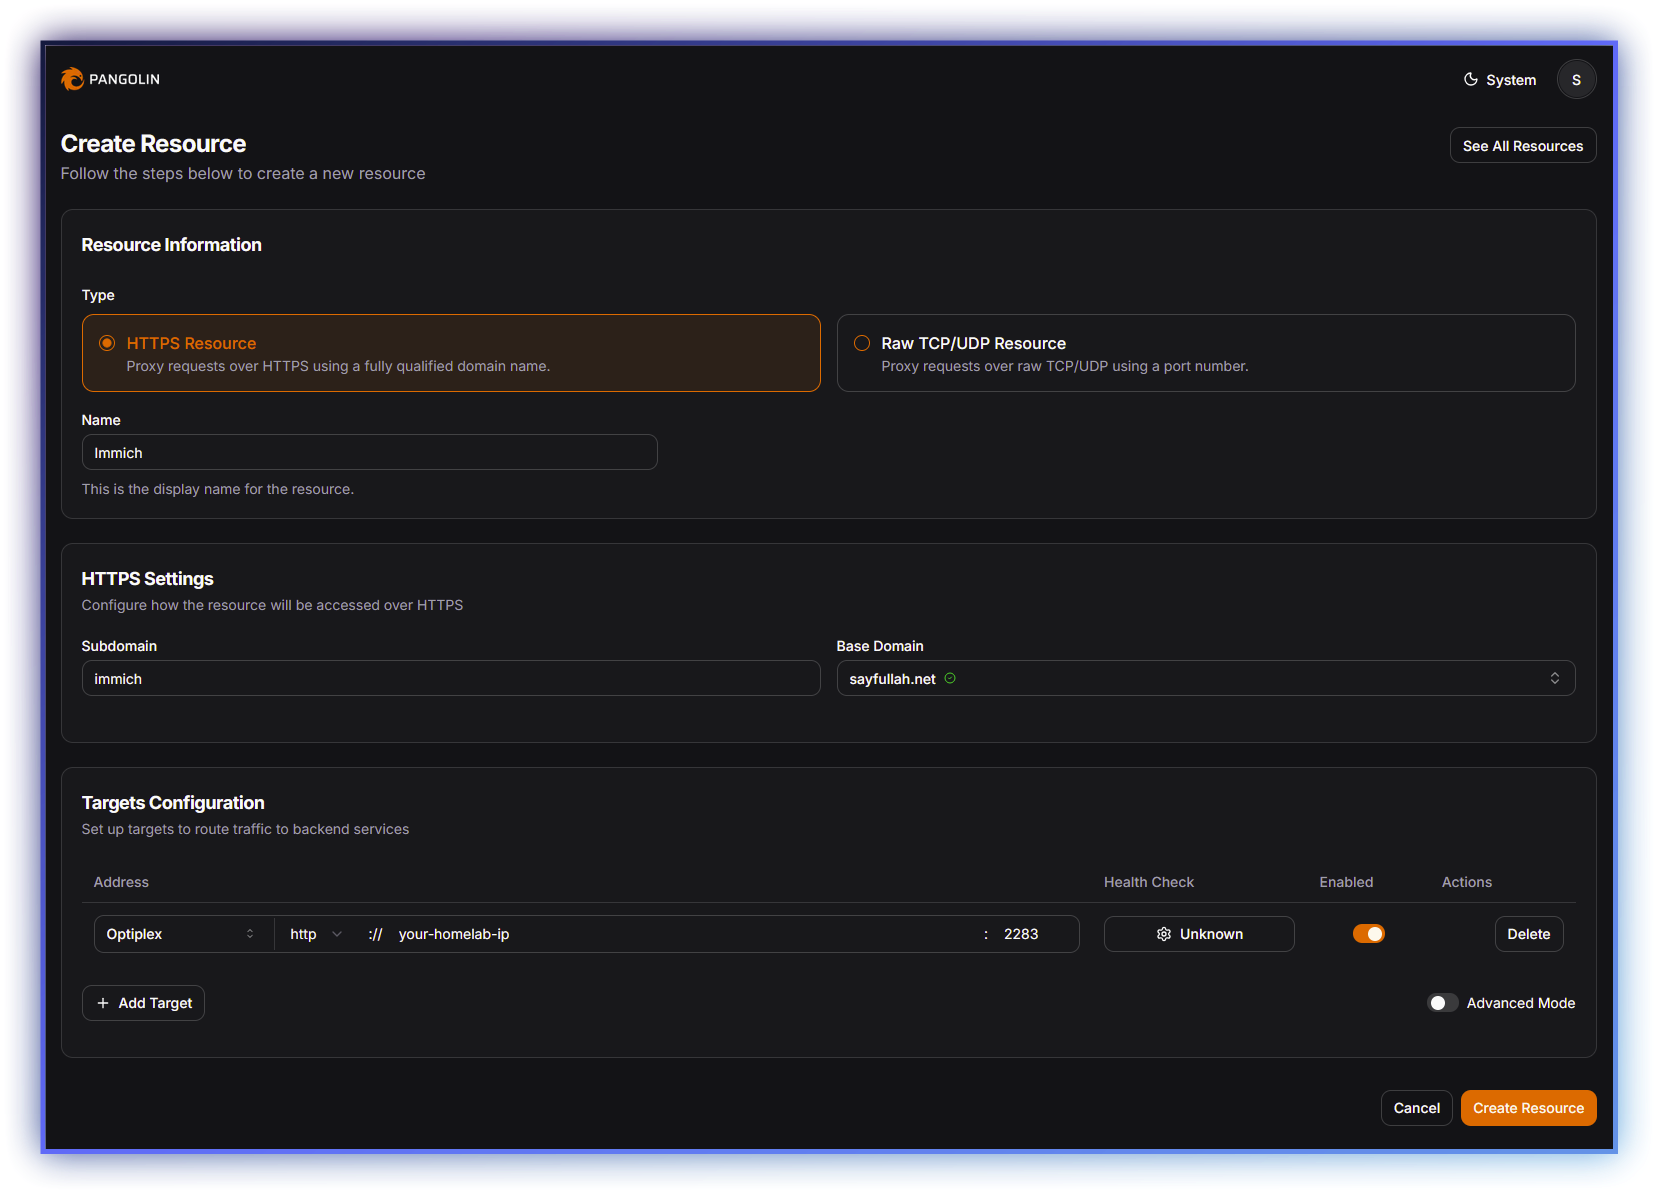
- Add a Public Resource
- Select your Newt site
- Give it a name (Immich)
- Choose a domain (immich.example.com)
- Enter the internal address:
- IP of the machine running Immich
- Port (e.g. 2283)
- Protocol: HTTP
You can also:
- Enable health checks
- Control visibility
- Attach auth later if desired
Large uploads work immediately, no tuning required.
Updating Pangolin safely
Because Pangolin is fully containerized, updates are predictable.
Before updating
config directory.Update steps
sudo docker compose down
sudo docker compose pull
sudo docker compose up -d
Migration scripts run automatically.
Afterward:
- Check the dashboard
- Verify sites are online
- Confirm tunnels reconnect
Updates feel boring, and that’s exactly what you want.
Final thoughts
Cloudflare is fine for websites.
Pangolin is built for infrastructure you actually care about.
Once you understand the split: Pangolin + Gerbil on the VPS, Newt in your homelab, the whole system clicks into place.
It’s clean. Predictable. And refreshingly free of arbitrary limits.
If you self‑host long enough, this architecture stops feeling clever and starts feeling obvious.